How to download install or set up quickbooks Web Connector (QBWC)?
QuickBooks Web Connector(QBWC) is software that allows you to integrate web-based applications with your QuickBooks POS or QuickBooks account software. With Web Connector, you can initiate or automate communication between different web services. Also, the entire process is easy to follow and implement. QB Web Connector is also known as QBWC or executable name QBWebConnector.exe. It is a Windows application packaged by Microsoft to improve the user experience for QuickBooks users. This Web Connector is responsible for the exchange of data between web-based applications and QuickBooks desktop products such as QuickBooks Pro, QuickBooks Premier, QuickBooks Enterprise, and QuickBooks POS.
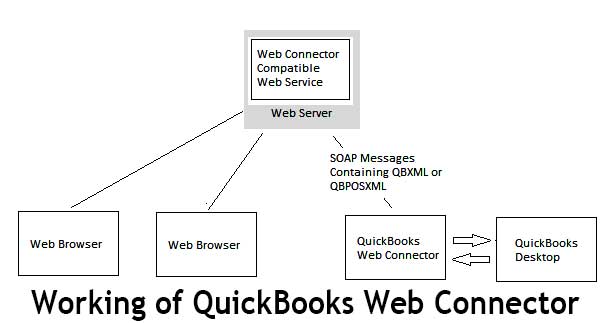
The QuickBooks Web Connector implements the Simple Object Access Protocol. It supports passing QBXML and QBPOSXML between a web application and QuickBooks. The set of methods used to integrate web applications with QuickBooks is called Web Connector WSDL.
Table of Contents
Steps For Installation of quickbooks Web Connector
Before you can install or reinstall a web connector, you will need a .qwc file from the web-service provider. In other words, you have to contact your service provider before doing anything. Once you get the .qwc file, follow the installation process below.
- Firstly, you download the installation package for the quickbooks Web Connector.
- Then You open the file as it is usually zipped and a .exe file runs in it.
- Then you follow the installation prompt until it is complete.
- Some Windows components will also be installed if necessary.
How to Uninstall QB Web Connector
Save the QuickBooks Web Connector file from your web-service provider before uninstalling QB Web Connector.
- In the keyboard press the Windows+R to open the Run window.
- Type in control then clicks on OK to open the Control Panel.
- Click Uninstall a program.
- Choose the Web Connector then click Uninstall.
If you can’t find QuickBooks Web Connector in the control panel then delete this path QBWebconnector folder in the following location: C:Program Files(x86)Common FilesIntuitquickbooks or C:Program FilesCommon FilesIntuitquickbooks
How to Add an Application to the QB Web Connector
- Enter the Web connector and click the add application Icon.
- Then click on browse and search the third party application’s .qwc file and select.
- After selecting the file, click on open.
How to Prevent Automatic Opening of the quickbooks Web Connect When Putting the Computer on.
For Windows 8 and 10
- Open the Run Window by pressing Windows + R on your keyboard.
- Type shell: start-up and click okay.
For Windows 7
- On the Windows Start button, click and select All Programs.
- Then choose a start-up from the program list.
- On the quickbooks Web connector, right-click and select Delete.
- When asked to confirm a shortcut delete, click on it.
How to add a new web service with QBWC?
Adding a new web service to the list of web services that Quickbooks web connector QBWC helps the user to communicate with is pretty simple, just like downloading a file. It should be noted that QB web connector can be used with any QuickBooks desktop product that is supported by QuickBooks SDK or the QBPOS SDK, it also includes the following:
- U.S. editions of quickbooks financial software products
- Enterprise solutions
- Premier (2002 or later)
- Pro (2002 or later)
- Simple start (2006 or later)
- quickbooks point of sale
- Canadian editions of quickbooks Pro, Premier, or Enterprise (2003 or later)
- UK editions of quickbooks Pro or Accountant edition (2003 or later)
- quickbooks Point of Sale (v4.0 or later) – QBWC 2.1.0.30 or earlier.
quickbooks Web Connector 2.1.0.30 and older versions only support up to TLS 1.0.
The QB Web Connector 2.2.0.34 and newer versions will only work with the following versions of quickbooks:
- U.S. editions of quickbooks Financial Software products
- quickbooks Enterprise Solutions (2015 or later)
- quickbooks Premier (2015 or later)
- Canadian editions of quickbooks (2015 or later)
- quickbooks Pro (2015 or later)
- UK editions of quickbooks (2015 or later)
Setting up your quickbooks Integration
- In the Operations,> quickbooks > Account Settings page, select the Admin User you wish to use and your quickbooks program type.
- Click the Get.QWC file button.
- Click the Download Your Store.QWC File link. This will open a pop-up asking if you would like to open or save the file. Save the file in an easily found folder. You will need to reference this file when you launch the quickbooks Webconnector program.
- Open the quickbooks software you are integrating with quickbooks Financial Software or quickbooks Point of Sale. Make sure the company you like to connect to your E-Commerce Web site is open.
- Download and install the QB Web Connector.
- Open the quickbooks Web Connector. Click the Add an application button and browse to the ‘NetSol Web Connector.qwc’ file you created and saved using the E-Commerce quickbooks Setup Wizard.
- After a few moments, and Authorize New Web Service screen will be displayed. Click on the OK button.
- quickbooks will display a screen for you to authorize access to your quickbooks company for your E-Commerce website. The screen will vary a bit depending on what quickbooks software you are using. Select the option for allowing access whenever quickbooks is open and continue.
- Enter your E-Commerce Control Panel password in the Password field of the quickbooks Web Connector. Click Yes if asked if you would like to save the password.
- You may sync your E-Commerce Web site with quickbooks no more than once every 10 minutes. If you would like the Web Connector to automatically sync your E-Commerce Web site with your quickbooks software, check the Auto-Run box and enter an interval (in minutes) in the Every Min field. For example, to sync every 5 hours, check the Auto-Run box and enter 300.
- To manually sync, place a check in the box on the left and click the Update Selected button at the top of the quickbooks Web Connector.
- After your first sync, go to the quickbooks Online Account Settings page in your E-Commerce Control Panel. (Operations tab > quickbooks > Account Settings). Place a check in the ‘Import inventory on the next sync’ and ‘Export Orders on the next sync’ boxes and click Save. Your E-Commerce website is now integrated with your quickbooks software. Until this step is completed no information will be synced between your E-Commerce web site and quickbooks.